The Magical Journey of Turning Clay into a Ceramic Vase
Ever wondered how a lump of clay transforms into a beautiful, elegant vase? It’s like magic, but with a lot of skill, creativity, and a bit of elbow grease. Join us on a fun and fascinating adventure as we explore the steps that turn humble clay into a work of art that brightens up any space!
Step 1: Sourcing the Perfect Clay
Our adventure begins with finding the perfect clay. Think of it as selecting the best ingredients for a gourmet recipe. Different clays bring different flavors to the table—some are smooth and silky, while others are rugged and textured. It’s all about finding the right match for the masterpiece in mind!
Step 2: Prepping the Clay (AKA Clay Yoga)
Before the clay can start its transformation, it needs a good stretch. Potters knead and wedge the clay to make it smooth and even, kind of like warming up before a workout. This crucial step ensures there are no sneaky air bubbles that could cause trouble later on.
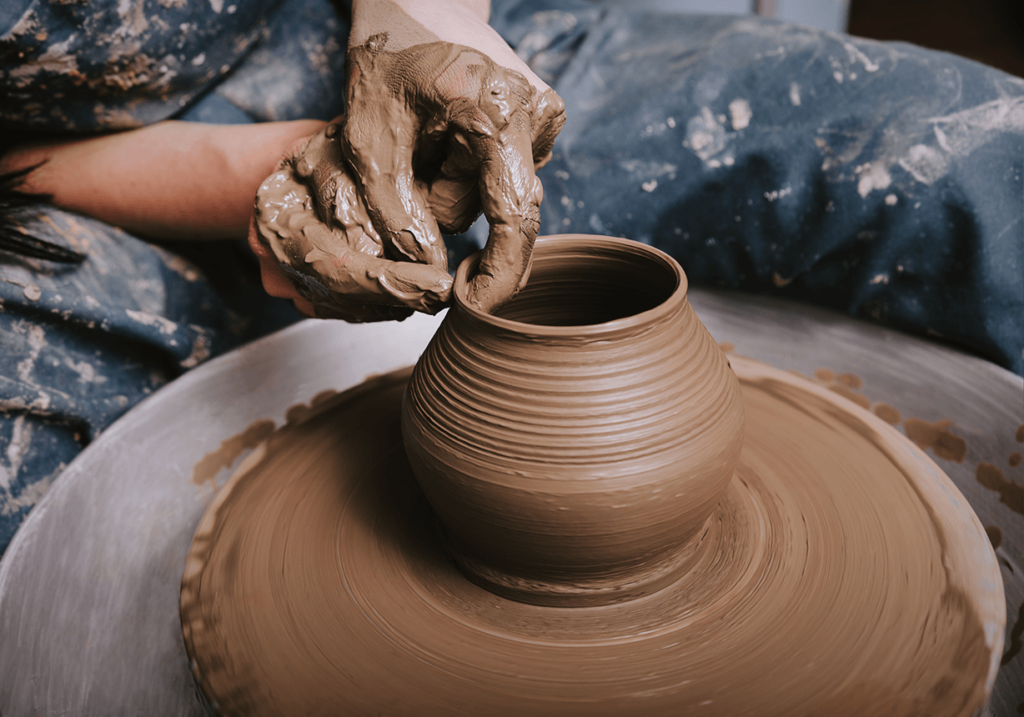
Step 3: Shaping the Vase – Let the Fun Begin!
Now the real magic starts! There are two main ways to shape the vase:
- Wheel Throwing: This is where the potter becomes a wizard, spinning the clay on a pottery wheel. With steady hands and a keen eye, they mold the clay into a symmetrical, balanced form. It’s like a dance between the potter and the clay.
- Hand Building: For those who like to freestyle, hand building is the way to go. Using techniques like pinching, coiling, or slab building, potters create unique, organic shapes that have their own charm and personality.
Step 4: Drying and Trimming – Time to Refine
Once shaped, the vase needs to dry to a leather-hard state. Think of it as the clay taking a short nap to firm up. When it wakes up, it’s ready for a little trim. Potters refine the shape, smooth the surface, and add any final details or textures. It’s all about perfecting the look!
Step 5: Bisque Firing – Into the Kiln We Go!
Next up, the vase takes its first trip to the kiln for a bisque firing. This process hardens the clay and makes it ready to soak up the glaze. The kiln is like a magical oven that transforms the clay into something more durable and long-lasting.
Step 6: Glazing – Adding Some Flair
Here comes the fun part—glazing! Potters apply liquid glaze to the bisque-fired vase, which will give it color, texture, and a shiny finish. It’s like dressing up the vase for a fancy party. The glaze can be dipped, brushed, or sprayed on, creating all sorts of cool effects.
Step 7: Glaze Firing – The Grand Finale
The glazed vase goes back into the kiln for its final firing. This time, the heat is cranked up to vitrify the glaze, making it smooth and often glossy. It’s like putting the vase through a final makeover, turning it into a stunning piece of art that’s both beautiful and functional.
Step 8: Finishing Touches – Ready for the Spotlight
After the glaze firing, the vase gets a final once-over. Any rough edges are smoothed out, and it’s given a good polish. Now, it’s ready to take center stage and wow everyone with its beauty and craftsmanship.
Creating a ceramic vase is like taking a magical journey from start to finish. Each step is filled with creativity, skill, and a touch of wonder. By understanding the effort and artistry involved, we can truly appreciate the unique charm and timeless appeal of handmade ceramics. So next time you see a gorgeous vase, you’ll know it’s not just a piece of pottery—it’s a piece of magic!